
GLideN64 is an open supply subsequent gen graphics plugin for most of the hottest N64 emulators obtainable. Gliden64 is developed by one of many authentic co-creators of the unique Glide64 plugin. The brand new Gliden64 plugin launched an Indiegogo marketing campaign that went on to boost hundreds of {dollars} from 165 backers.
Glide64 vs GLideN64
Initially created again in 2001, GLideN64 was initially designed for use solely on 3dfx graphics {hardware} via its proprietary graphics API, Glide3X. Nevertheless, as time went on, the plugin gained help for OpenGL and have become obtainable to all PC customers.
GLideN64 shortly gained a whole lot of recognition resulting from its excessive compatibility and spectacular help of high-resolution textures for many video games. Whereas the ultimate official model of GLideN64 was launched again in 2012, due to its open-source nature, the mission continues to be very a lot alive and kicking. It’s typically included as a major or secondary graphics plugin in most of the finest N64 emulators, so in case you’re accustomed to N64 emulation, you’ve probably heard of Glide64.
Whereas the emulation degree achieved by GLideN64 is sort of spectacular, it’s nonetheless removed from full resulting from some elementary limitations of its structure. That’s why in 2013, the developer begain engaged on a brand new graphics plugin mission referred to as GLideN64. The purpose of this experimental mission was to transform Glide64 options utilizing the ability of contemporary OpenGL and help options that had been beforehand unattainable to emulate and finally create a newly fastened and improved plugin characteristic set.
The GLideN64 and Glide64 video plugin are very completely different when it comes to supply code, however the newer model and new options of the plugin usually are not made solely from scratch both. As a substitute, it makes use of an outdated open supply OpenGL graphics plugin named “glN64” as the premise for the brand new plugin. It was named “GLideN64” to emphasise its origin and to focus on it because the religious successor to the earlier Glide64 plugin.
For those who’d wish to learn extra about GLideN64 and the completely different variations, you possibly can try the developer’s weblog devoted to the mission right here. You’ll discover every kind of technical particulars in addition to screenshots and movies made utilizing the brand new plugin.
The one downside of GLideN64 is that these attractive high-resolution graphics could be fairly demanding in your CPU. It’s for that reason that GLideN64 is supposed for increased finish computer systems and gadgets so you need to anticipate that stepping into. In case your machine is lower than spec, you possibly can anticipate your expertise to not be so nice and your sport pace to be sluggish.
Learn how to Set up GLideN64 – Project64
Putting in GLideN64 for Project64 couldn’t be simpler. The latest model of Project64 now comes pre-packaged with GLideN64 by default. You merely must obtain and set up the most recent model of Project64 from their public launch web page right here.
On the time of scripting this, essentially the most not too long ago obtainable model of Project64 is v3.0.1. Project64’s Github official repository mentions that the minimal necessities for operating GLideN64 are OpenGL 3.3 and that Intel built-in graphics can have points that aren’t current with Nvidia and AMD GPU’s even when the necessities are met.
Set up GLideN64 on an Older Model of Undertaking 64
If for no matter purpose you don’t wish to use the newest model of Project64 and you continue to wish to attempt to allow the GLideN64 graphics plugin, you possibly can strive the next steps:
- Set up GlideN64 from the Github repository right here
- Open the GLideN64 ZIP information, head to bin > Muper64Plus_x64 and discover a file referred to as mupen64plus-video-GLideN64.dll
- Extract/copy the file to the Project64 emulator folder in Plugin > GFX
- Open up Project64 and go to Choices > Settings
- Within the Settings window, click on Plugins
- Beneath Video (graphics plugin) click on the drop down and select Glide64 for PJ64 and click on OK
- Then go to Choices > Configure Graphics Plugin
- If you would like your graphics to look sharper, you possibly can enhance the decision of Project64 in window and full display screen modes and also you for sharper textures, you possibly can verify Anisotrophic filtering
- You can even verify off Present superior emulation choices and Present texture enhancement choices after which click on OK to tinker a bit extra with the choices if you want, however do take into account that these further choices can hog your CPU assets, so take a look at and see what’s supported on your atmosphere
Learn how to Set up GLideN64 – Mupen64Plus
For those who’re seeking to set up GLideN64 for Mupen64Plus, your finest wager is to obtain and use an superior package deal configuration that’s already constructed for you referred to as Simple64 which is a frontend graphical person interface containing the GlideN64 plugin.
Simple64 was beforehand recognized and known as m64p and is utilized by many. You possibly can seize the most recent model of Simple64 from the official Github repository right here.
To put in Simple64 and entry GLideN64 for Mupen64Plus on Home windows, you possibly can:
- Obtain this simple64-win64*.zip file and unzip it someplace in your house listing.
- After downloading the information and extracting them, you possibly can then run the file named simple64-gui.
- All the video plugin settings could be discovered underneath Settings > Core and Video Settings > ParaLLeEl Video.
Learn how to Set up GLideN64 – RetroArch
You possibly can set up GLideN64 on RetroArch through the use of the most recent Mupen64Plus core referred to as Nintendo – Nintendo 64 (Mupen64Plus-Subsequent).
Putting in this N64 emulation core will permit you to use GLidenN64 on RetroArch. Happily putting in GLideN64 on RetroArch is a breeze, which is far appreciated!
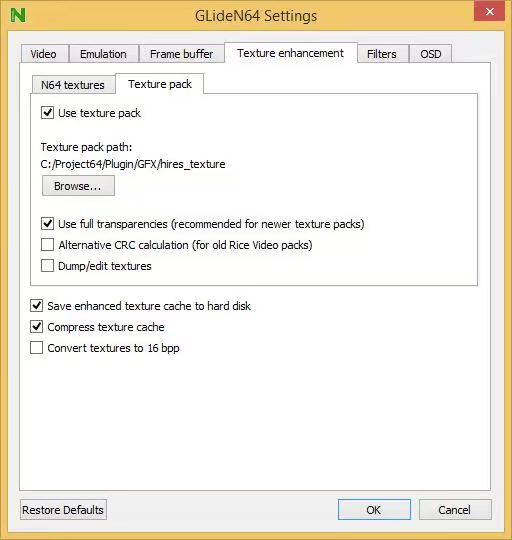
Learn how to Use GLideN64 Textures
Let’s say you’re attempting to load up a texture pack, for instance an OOT texture pack. Info on setting this up generally is a bit laborious to search out. You’ll wish to do the next:
- Put the .htc config file in PluginGFXcache
- Make it possible for it’s within the decrease case cache
- Verify to make use of full transparencies and save enhanced texture cache to harddisk
- Now go underneath a cache folder the place GLideN64.dll is situated
- The feel pack path folder is ready as PluginGFXhires_texture
- The ultimate path of your .htc file will probably be one thing like the next – Project64PluginGFXcacheTHE LEGEND OF ZELDA_HIRESTEXTURES.htc
Learn how to Upscale Video games With GLideN64 Settings
You possibly can obtain a completely upscaled 1080p 16:9 widescreen N64 emulation sport expertise by merely tweaking a number of of the options in GLideN64 settings:
- Open up the video/graphics settings in both Project64 or Mupen64Plus
- Within the Video Settings tab:
- Change full display screen decision to 1920 x 1080 (this equal a 16:9 side ratio)
- Change the side ratio settings to Attempt to regulate sport to suit
- Verify off Overscan and set the NTSC and PAL settings to 5 in all the 4 packing containers
- Select Quick approximate anti-aliasing (FXAA)
- Within the Emulation Tab
- Select A number of of N64 decision and replace the worth to 8x
- Change Background rendering extra (HLE) to One piece
And identical to magic, your entire finest roms will now be in a completely upscaled 16:9 side ratio. Nintendo 64 retro gaming has by no means regarded this good!
The put up The GLideN64 N64 Emulator Graphics Plugin appeared first on Switcher.gg.
