
This information will cowl the right way to setup RetroPie for taking part in N64 video games together with some associated questions. Let’s get began.
How To Setup RetroPie for N64?
What You’ll Want
Earlier than we get began, there are some things that you just’ll need to be sure to have out there:
- You’ll have to have a Raspberry Pi gadget. You should purchase a Raspberry Pi 4 off of Amazon right here.
- Ensure you have already downloaded and put in RetroPie which you are able to do from the ReproPie web site obtain web page right here.
- You’ll want an exterior keyboard and mouse to make use of together with your Raspberry Pi to obtain the BIOS information and your ROMs
- Ensure you have at a minimal one N64 ROM prepared to have the ability to check with. It is going to have to be in one of many following file extensions: .z64, .n64, .v64, or .zip
- You’ll additionally want a controller helpful that may hook up with the RetroPie to make use of to play video games. For those who don’t but have one, this Retro Fighters Brawler64 USB controller is a good alternative:
- If at any time you’d prefer to seek the advice of the official RetroPie docs, you are able to do so on their web site right here.
1. Setup Your Raspberry Pi
By default, RetroPie has an N64 emulator already put in for you that is able to use. It’s the Mupen64Plus emulator model lr-mupen64plus. If the emulator isn’t already put in in your model of RetroPie, you are able to do the next:
- In RetroPie, go to the choices menu after which RetroPie Setup > Handle packages > Handle most important packages
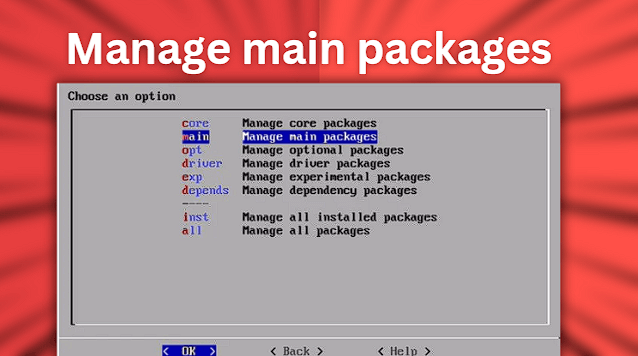
- Go down and select lr-mupen64plus
- Subsequent you’ll need to select Set up from pre-compiled binary
- RetroPie will now mechanically set up the lr-mupen64plus emulator
- As soon as it finishes putting in, head again by means of the menu after which select Exit
2. Transfer Your N64 ROMs To The ROMs Folder
Seize your N64 ROM information as a result of now you’ll want to maneuver them over to the RetroPie’s roms folder.
There are a number of methods to do that, however I’ll be protecting what I consider is the only technique to save lots of you time.
Transfer ROM Recordsdata Utilizing Your Raspberry Pi
You’ll have to have the Pixel desktop surroundings instrument put in in your Raspberry Pi to have the ability to entry desktop mode on it. We’ll now be protecting the right way to get this setup.
Head to the RetroPie choices menu after which go forward and go to RetroPie Setup > Configuration / Instruments > Raspbian Instruments > Set up Pixel desktop surroundings.

After you will have efficiently put in the Pixel desktop surroundings in your Raspberry Pi, go forward and restart the gadget. After restarting, you need to now have the ability to entry desktop mode by going to Ports > Desktop.
The desktop surroundings is cool as a result of it lets you simply navigate the information in your Raspberry Pi equally to how you’ll on a Home windows pc.
Now that we’ve put in the desktop surroundings, we’ll want to maneuver our N64 ROM(s) to the correct folder on our Raspberry Pi:
- /house/pi/RetroPie/roms/n64/
The simplest solution to get information out of your PC pc to your Raspberry Pi is by remotely accessing the Pi out of your PC. To do that, you’ll first need to make it possible for your Raspberry Pi is linked to the identical community as your PC.
First be certain your Pi is linked to your WiFi or to your community router instantly utilizing an ethernet cable. In your Raspberry Pi, open the terminal window and sort in:
- sudo apt-get set up xrdp
This command will now start to put in the distant desktop server.
Now you’ll want to determine the IP tackle of your Raspberry Pi. To do that kind, you’ll need to use the next command:
Make a remark of your Raspberry Pi’s IP tackle as a result of we might want to use this quickly as a way to hook up with it remotely. You’ll additionally want your Pi’s username and password.
Now in your PC, go forward and open the distant desktop app by typing distant desktop into the Home windows search bar within the backside left. Click on distant desktop connection to make use of the distant desktop app.
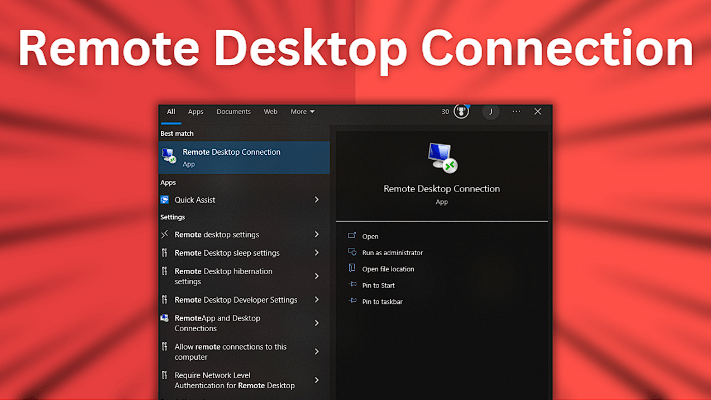
Within the Distant Desktop Connection window that pops up, you’ll now need to enter the IP tackle of your Raspberry Pi that you just received earlier. After clicking join, then login utilizing your Raspberry Pi’s username and password.
If the whole lot went appropriately, you need to now have the ability to remotely entry your Raspberry Pi out of your PC. To double examine that you’ll be able to entry your Raspberry Pi remotely, open up Home windows File Explorer and sort retropie into the tackle bar. You need to see your Retropie information seem.
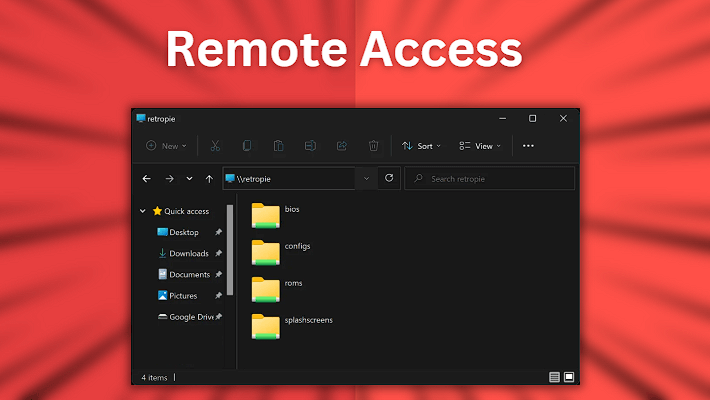
Keep in mind earlier, we talked about that we would want to repeat our N64 ROMs from our PC to this listing on our Raspberry Pi:
Navigate to roms > n64 and duplicate your N64 information out of your PC to this folder in your Raspberry Pi. After you’ve copied your ROMs over, restart your Raspberry Pi and the video games ought to now seem as anticipated.
3. Play Your N64 Video games
Now that your Raspberry Pi has been restarted, you’ll be able to boot up EmulationStation and when you spotlight Nintendo 64, it ought to present you on the backside what number of video games can be found to be performed for that console. You’re prepared able to play!
Can You Play N64 on RetroPie?
Sure, you’ll be able to completely play N64 video games on RetroPie! All you’ll have to play is a Raspberry Pi (we advocate a Raspberry Pi 4), have RetroPie put in on the Raspberry Pi gadget, an exterior keyboard and mouse, no less than one N64 ROM prepared to check with, and a controller prepared to make use of to play. After you’ve received all these items prepared, you’ll be able to observe the information on this web page to get all setup!
How you can Make N64 Video games Look Higher on RetroPie?
You possibly can enhance the graphics of the N64 video games that you just play on RetroPie by deciding on the proper emulator/graphics plugin. This could enhance efficiency and make an enormous distinction within the gameplay high quality.
You need to at all times affirm that your N64 video games run nicely first utilizing the default graphics plugin earlier than testing with extra excessive decision choices. By default, all emulators will probably be set to the bottom decision, CEA-1, for many shows. That is to by default enhance efficiency by limiting up-scaling. This may be manipulated for every emulator although.
The GLideN64 graphics plugin is a good graphics plugin to make use of for upscaling Nintendo 64 video games on RetroPie. It beforehand typically had points with body buffer emulation on the Raspberry Pi that had been trigger some visible glitches and crashes, nevertheless the latest model of RetroPie out there has mounted this difficulty.
What N64 Emulator Does RetroPie Use?
By default, Mupen64Plus-auto is the N64 emulator that comes with RetroPie. Whereas the Libretro cores lr-mupen64plus and lr-mupen64plus-next have the comfort of RetroArch configurations and instantly studying compressed zip information, standalone Mupen64Plus often leads to higher efficiency.
Mupen64Plus is likely one of the finest N64 emulators out there, however you’ll be able to attempt putting in one other N64 emulator just like the Challenge 64 emulator which additionally runs most video games very nicely.
How To Map N64 Controller on RetroPie?
With RetroPie open in your Raspberry Pi and your N64 controller hook up with it, navigate to the primary menu.
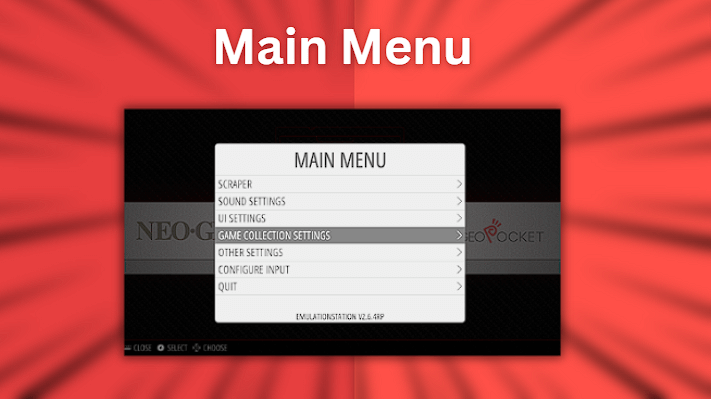
Scroll down and head to Configure Enter > Sure.
After deciding on Sure to configure enter and ensuring your N64 controller is totally plugged into your Raspberry Pi, you’ll be prompted to carry the A button in your N64 controller to configure it.
You need to then see the title of the N64 controller populate within the backside of the Configure Enter display screen. You possibly can then start to configure your N64 controller and map the buttons accordingly.
As soon as executed, you’ll merely want to pick out the Okay button and also you’re now prepared to make use of your N64 controller!